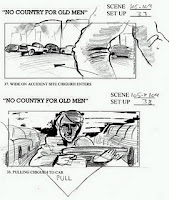
The concept of a storyboard is that you avoid unnecessary headaches when filming on location- camera angles, character movement and camera movement can all be worked out and you can focus instead on aspects like lighting and preparing your actors for each scene. This is especially important when working in larger groups- you should all be clear about what you need to film and how you plan to film it. This will reduce the chances of all of you giving your actors different instructions. Of course, this does not mean that you are not able to divert from your storyboard if on location you realise that a different camera angle may be better.
A storyboard should include the following information:
From the drawing:
- What is in the frame of the shot
- The camera angle
- Any camera movements
- Any character movements
- Any sound effects/dialogue
- Shot duration
- Written camera angle (plus a possible brief description)
The storyboard is crucial and should not be rushed. It would likely benefit from 2 drafts, so do not spend too much time making the first draft a work of art! Below are two additional bits of help- the link features some Youtube tutorials (if you watch make sure you embed the video and discuss what you learned) and a sample storyboard image from the fantastic 'No Country For Old Men'. Please remember: this should be the moment when you think creatively about shots, not when you are 'on set'. http://filmmakeriq.com/2010/10/500-storyboard-tutorials-resources/

Finally, you will need to prepare even more by doing an animatic storyboard, which has become an expectation of AS Level students and is a much more advanced way of demonstrating your plans. You will need to:
(1) Scan in your original storyboard
(2) Show a teacher your storyboard and act on any advice (e.g. additional shots needed) provided
(3) Take stills of each storyboard frame and put them into iMovie/Premiere Pro
(4) Add sound
(5) Adapt shot durations
(6) Add titles (consider the order)
Essentially, your storyboard should be a full reflection of what your opening sequence should look like.
H/W Write a post discussing what you have changed and what you have learned in
Below are two different examples (there are more on Youtube) of animatic storyboards. The top one is much more 'basic' and the one below a little more detailed but much more difficult to do.


0 comments:
Post a Comment