Thursday 3 December 2015

Tuesday 20 October 2015

Focus Group Advice

You will need to ask 5 questions to a group (3-4 people)- ideally most/all will be from your target audience. You can film this on your phone or any other device, provided you can access and edit the footage.

The idea is to have a group discussion- so aim to ask questions that get people discussing rather than yes/no questions.

This is a really good opportunity to find out first hand what your audience may respond to.

Exemplar questions (welcome to adapt/use these)

1. Why do you think people pirate films and television shows?

2. Do you think piracy is an okay thing to do?

3. Do you think piracy affects the British film and television industry? Do you care?

4. What kind of things may appeal to a 15-30 audience to promote anti-piracy?

5. If you were making an anti-piracy ad, what would you include?

Monday 28 September 2015

Links for Sociology Family

For each of the family structures below:

(1) Briefly explain the structure
(2) Discuss either a Functionalist/Marxist/Feminist approach to the structure, thinking which may be most appropriate

http://www.everyculture.com/South-Asia/Nayar-Marriage-and-Family.html - the Nayar people

http://en.wikipedia.org/wiki/Kibbutz - Kibbutzim

http://en.wikipedia.org/wiki/Foster_care - foster care

http://www.thewhocarestrust.org.uk/pages/childrens-homes.html - children’s homes

http://www.livescience.com/6073-children-raised-lesbians-fine-studies-show.html - lesbian parents

http://www.livescience.com/17913-advantages-gay-parents.html - gay parents

Thursday 24 September 2015

Tuesday 15 September 2015

Tuesday 8 September 2015

AS Film Assignment: Cinematography

Use the Powerpoint below to help you with answering the questions on the Cinematography worksheet.


Below are clips from the films Speed Racer (2008) and The Assassination of Jesse James By The Coward Robert Ford (2007).


Using the keywords and the examples we looked at in class discuss the differences in cinematography between the two. If you are struggling in comparing, write a separate discussion for each in terms of the 'look'.


Focus on 'quality' points in more detail rather than describing every shot. You should aim to write about 250- 500 words words and have it ready to hand in for the next lesson.


Tuesday 30 June 2015

Extra Challenge Research: Director Case Study

While not compulsory, one way in which to make your blog stand out from others is to delve deeper in your research and do a case study about a specific music video director and identify their particular 'auteur' style- essentially look for stylistic devices that they consistently use in their videos that you may bring to your production work.

The website www.imvdb.com provides a music video database and can be used to demonstrate the work from various directors. You may wish to do it in terms of a specific genre of music video.

Below are a list of examples of music video directors that may be interested to do some further research on:

Romain Gavras- dark, gritty, high energy videos predominantly by electronic music artists (M.I.A., Justice, Simian Mobile Disco)

Daniels- high concept, plot heavy, amusing videos for 'indie' rock artists (Foster The People, Tenacious D and The Shins)

Yoann Lemoine- saturated colours and a slightly melancholic feel for a series of female singers (Lana Del Rey, Katy Perry, Taylor Swift)

Hype Williams- legendary music video director, predominantly hip-hop and R & B. More than 100 videos over 20 years (recently Nicki Minaj, Ja Rule, Busta Rhymes)

As always, try to share the information in a visually interesting manner. Below is a sample of a Glog I created about the music video director Tom Scharpling, who won the Spin Magazine Music Video Director of the Year in 2012- please click on the links if you are curious to see some of his videos!

Tuesday 14 April 2015

Friday 6 March 2015

Media Awards 2015


This years Media Awards will be held at Sutton Empire Cinema on Thursday the 30th of April 2015.

The evening is designed to celebrate and showcase the achievement of our Media students and their high standards of practical and academic work. We're really excited to be able to showcase our students films on the big screen. 

More information on this exciting event, tickets and the schedule of the night to follow!


Trailers


Tuesday 10 February 2015

1st Draft Feedback & Plan

You will need to export your first draft and add it to Youtube.


You will also need to embed the Padlet onto your blog.


You should reflect on feedback you agree with and disagree with (using screenshots) and then use this as a plan to focus on 3 priorities: this may include additional filming, editing or additional sound. These need to be identified and listed.


Friday 30 January 2015

Research Into Previous Projects

Go to http://ocrmediastudies.weebly.com/coursework-with-levels.html and make a post summarise what you have learned from previous projects.

You should focus on what aspects you thought were good and would aspire to do and reflect on what you need to avoid- do not be insulting about footage but constructive in your criticism.

Screengrabs are fine but please avoid Tubechops for this. Please bear in mind the marking criteria when discussing what you have learned, so don't discuss acting.


material appropriate for the target audience and task;

using titles appropriately according to institutional conventions;

using sound with images and editing appropriately for the task set;

shooting material appropriate to the task set;, including controlled use of the camera, attention to framing, variety of shot distance and close attention to mise-en-scene;

using editing so that meaning is apparent to the viewer and making selective and appropriate use of shot transitions and other effects.

Wednesday 28 January 2015

Interactive Media Academy Auditions

Please see below for a series of YouTube tutorials for Blender. Please again note that you will not be solely assessed in terms of how far you get- if you don't finish in the hour this does not mean you fail your audition, so you are better off following the instructions clearly rather than skipping any steps.

You should ensure you save your Blender progress after each tutorial so you do not need to start again if you encounter an issue.


Tuesday 20 January 2015

Location shots

With almost any film, a crucial part of the process is to find appropriate locations (the person who does this is called a 'Location Scout') where to film. These should not only be aesthetically impressive locations but also ones that will be practical to film at (e.g. where you will not be disrupted).

In order to prove to the examiner that you have sufficiently considered different locations during pre-production, you will need to take a few photos of some if not all of the various places that you plan to film, ideally with additional pictures of any significant features of the design (e.g. a creaky door, somewhere where you plan to put a prop).

See below for an example:


You should also write a couple sentences to discuss the reason for choosing your locations- these reasons are likely to be predominantly aesthetic but practical reasons should also be briefly mentioned.

Casting Shots

Casting shots are useful in that they will help you to prove to the examiner that you have put some thought into who would be most appropriate for your film rather than simply finding someone at random. If you are able, you could even strive to have some auditions.

Ideally, you should try to do what is called a head shot of all your 'major' actors (who either appear in the majority of your film and/or have lines of dialogue). The following extract is taken from Wikipedia as some guidance of taking a head shot, and is followed by some examples of different head shots:

Theater, film, and television actors, models, singers, and other entertainers often are required to include a head shot, along with their resume, when applying for a job. These head shots are usually more artistic, intended to portray the subject in the best possible light. They often have the subject facing off-centre. A performer will often have head shots expressing different poses and expressions to give a potential employer an idea of the subject's range of appearances or expressions. Those types of head shots are called "looks." The headshots that include a person’s shoulders are called "three quarter" shots.
Actor's headshots, when printed and not simply uploaded online to an industry database, are done in an 8×10" format. Other promotional images, e.g., press shots and lobby prints, may be in many different aspect ratios. Acting headshots are usually 8×10" prints. Acting headshots are often not photographic prints but will be printed via a lithographic process or the laser process.
The main purpose of an actor's head shot is identification. Therefore the most important feature of an actor's headshot is that it looks like the subject. Actor's head shots should be clear; theatrical headshots are usually very "neutral" looking shots of the actor clearly showing his facial features.
There are a few types of Headshots:
Commercial – typically (not always) has the person smiling and projects warmth and friendliness.
Theatrical – usually serious, focused and actors are not smiling.
Glamour – More artistic and idealized images.
Headshots are intended to show a person as she is currently (age, look, style, etc.) and reflect her best qualities. Therefore, if an actor's hair is recently cut or coloured, she might then need a new headshot to reflect the new image of herself.


You should try to briefly contextualise your pictures with one or two reasons why you chose these actors- are they similar to your characters in real life? Are they drama students? Is it a practical consideration (i.e. you are in the group and so understand the project better)?

Monday 12 January 2015

Storyboard

While you must complete at least 1 storyboard for your coursework assignment, it should also act as a valuable aid for when you film.

The concept of a storyboard is that you avoid unnecessary headaches when filming on location- camera angles, character movement and camera movement can all be worked out and you can focus instead on aspects like lighting and preparing your actors for each scene. This is especially important when working in larger groups- you should all be clear about what you need to film and how you plan to film it. This will reduce the chances of all of you giving your actors different instructions. Of course, this does not mean that you are not able to divert from your storyboard if on location you realise that a different camera angle may be better.

A storyboard should include the following information:

From the drawing:
  • What is in the frame of the shot
  • The camera angle
  • Any camera movements
  • Any character movements
Guided information:
  • Any sound effects/dialogue
  • Shot duration
  • Written camera angle (plus a possible brief description)
Your initial storyboard should be on the sheets provided but you are welcome to use a digital camera to take photos of your proposed shots and use this as the final storyboard.

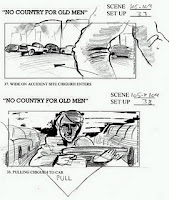
The storyboard is crucial and should not be rushed. It would likely benefit from 2 drafts, so do not spend too much time making the first draft a work of art! Below are two additional bits of help- the link features some Youtube tutorials (if you watch make sure you embed the video and discuss what you learned) and a sample storyboard image from the fantastic 'No Country For Old Men'. Please remember: this should be the moment when you think creatively about shots, not when you are 'on set'. http://filmmakeriq.com/2010/10/500-storyboard-tutorials-resources/


Finally, you will need to prepare even more by doing an animatic storyboard, which has become an expectation of AS Level students and is a much more advanced way of demonstrating your plans.  You will need to:

(1) Scan in your original storyboard

(2) Show a teacher your storyboard and act on any advice (e.g. additional shots needed) provided

(3) Take stills of each storyboard frame and put them into iMovie/Premiere Pro

(4) Add sound

(5) Adapt shot durations

(6) Add titles (consider the order)

Essentially, your storyboard should be a full reflection of what your opening sequence should look like.

H/W Write a post discussing what you have changed and what you have learned in

Below are two different examples (there are more on Youtube) of animatic storyboards. The top one is much more 'basic' and the one below a little more detailed but much more difficult to do.


Thursday 8 January 2015

Production Ident Titles

You should all have designed a Production Ident.

On your blog, you should reflect on the construction of this ident in 2 ways:

(1) Evaluate whether you are happy about your design and why- you might touch on points about how it fits conventions, suits the target audience or discuss any other criteria.

(2) Discuss how you might use what you learned in the construction of your production ident and how you might use it in the construction of your film credits (Directed By, Starring etc.). What effects might you use that would be suitable to the genre?

Again- please be visual and please try to think about ways that you can make it more exciting.